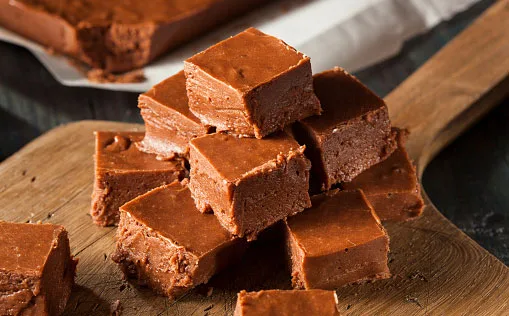
Fantasy Fudge Recipe: A Sweet, Creamy Classic
There’s something undeniably magical about homemade fudge, and Fantasy Fudge is a classic that has stood the test of time. With its rich, creamy texture and decadent sweetness, this treat is perfect for holidays, celebrations, or even a quiet evening when you’re craving something indulgent. Originally made famous by the recipe printed on the back of marshmallow creme jars, Fantasy Fudge has become a go-to for candy lovers.
If you’ve never made fudge before, don’t worry! This recipe is simple, forgiving, and yields incredible results. Whether you’re a seasoned pro or a first-timer, this step-by-step guide will ensure your Fantasy Fudge comes out perfectly every time.
Let’s dive into the process of making this dreamy dessert!
Why You’ll Love Fantasy Fudge
- Classic Flavor: The combination of chocolate and marshmallow creme creates a smooth, rich fudge.
- Easy to Make: No candy thermometer is needed—just follow the instructions closely.
- Perfect for Gifting: Package it in a decorative box or tin, and you’ve got a thoughtful homemade gift.
- Versatile: Add nuts, swirls of peanut butter, or even a sprinkle of sea salt for a personal touch.
Ingredients
Here’s what you’ll need to make a batch of Fantasy Fudge:
- 3 cups granulated sugar
- ¾ cup unsalted butter (1 ½ sticks)
- ⅔ cup evaporated milk (not condensed milk)
- 1 package (12 ounces) semisweet chocolate chips
- 1 jar (7 ounces) marshmallow creme
- 1 teaspoon pure vanilla extract
- 1 cup chopped walnuts or pecans (optional)
Optional Toppings:
- Crushed candy canes
- Sea salt flakes
- Mini marshmallows
Step-by-Step Instructions
Step 1: Prepare Your Pan and Ingredients
Line Your Pan:
Line a 9x13-inch baking dish with parchment paper or aluminum foil, allowing some overhang for easy removal. Lightly grease the lining with butter or non-stick spray.Measure and Organize:
Measure out all your ingredients beforehand. Fudge comes together quickly, and having everything ready will make the process smoother.
Step 2: Heat the Sugar Mixture
Combine Ingredients:
In a heavy-bottomed saucepan, combine the sugar, butter, and evaporated milk. Stir over medium heat until the butter is melted and the sugar has dissolved.Bring to a Boil:
Increase the heat to medium-high and bring the mixture to a rolling boil, stirring constantly.Boil for 4-5 Minutes:
Once the mixture is boiling, set a timer for 4-5 minutes. Continue stirring constantly to prevent burning. The mixture will thicken slightly, and the bubbles will become smaller and more consistent.
Step 3: Combine with Chocolate and Marshmallow Creme
Remove from Heat:
Take the saucepan off the heat immediately after the boiling time is complete.Add Chocolate Chips:
Stir in the chocolate chips until fully melted and the mixture is smooth. The residual heat will melt the chocolate quickly.Add Marshmallow Creme and Vanilla:
Scoop the marshmallow creme into the saucepan and stir vigorously until it’s completely incorporated. Add the vanilla extract and stir to combine.Optional Nuts:
If you’re using nuts, fold them in at this stage.
Step 4: Pour and Set
Pour into the Pan:
Carefully pour the fudge mixture into the prepared pan, spreading it evenly with a spatula. Work quickly, as the fudge will start to set as it cools.Smooth the Surface:
Use the back of the spatula to smooth the surface, pressing down lightly to eliminate any air bubbles.Optional Toppings:
If desired, sprinkle toppings like crushed candy canes, sea salt, or mini marshmallows over the fudge while it’s still warm.
Step 5: Cool and Cut
Let it Set:
Allow the fudge to cool at room temperature for at least 2-3 hours, or until it’s firm. For quicker results, place the pan in the refrigerator for 1-2 hours.Lift and Cut:
Once the fudge is set, use the overhanging parchment or foil to lift it out of the pan. Place it on a cutting board and use a sharp knife to cut it into squares. Wipe the knife clean between cuts for neat edges.
Tips for Perfect Fantasy Fudge
- Use Quality Ingredients: The better your chocolate and butter, the better your fudge will taste.
- Don’t Skip the Boil Time: Boiling the sugar mixture for the correct amount of time ensures the fudge sets properly.
- Stir Constantly: Keep stirring while boiling to avoid scorching the mixture.
- Work Quickly: Once the fudge is mixed, pour it into the pan promptly to prevent premature setting.
- Store Properly: Keep the fudge in an airtight container at room temperature for up to 1 week or in the refrigerator for up to 2 weeks.
Variations to Try
Peanut Butter Fantasy Fudge:
Replace half of the chocolate chips with peanut butter chips for a nutty twist.Mint Chocolate Fudge:
Add ½ teaspoon of peppermint extract and swirl in crushed peppermint candies.Rocky Road Fudge:
Fold in mini marshmallows and chopped almonds before pouring into the pan.Dark Chocolate Sea Salt:
Use dark chocolate chips and sprinkle sea salt flakes over the top for a sophisticated flavor.
Conclusion
Fantasy Fudge is the ultimate crowd-pleaser. Its creamy texture, rich chocolate flavor, and customizable options make it a versatile treat for any occasion. Whether you keep it simple or dress it up with toppings, this recipe is sure to become a favorite in your household.
So, grab your ingredients, whip up a batch, and share the joy of homemade Fantasy Fudge with your friends and family. Happy cooking!


0 Comments